Troubleshooting a Dead Car Battery
When a car fails to start, the battery is often the first component to inspect. A dead or weakened battery can result from several factors, including age, extreme temperatures, or electrical faults. Rather than immediately replacing the battery, a systematic troubleshooting approach can identify the underlying issue and potentially restore normal function. This process involves examining physical connections, assessing electrical drains, performing a jump-start when needed, and measuring battery capacity with a multimeter.
Understanding the typical symptoms of a failing battery is useful for narrowing down the problem. Dim headlights, slow cranking, or a clicking sound when turning the key often indicate a battery that is not delivering sufficient voltage. However, similar symptoms can also arise from a faulty alternator or corroded terminals. Therefore, a methodical inspection helps distinguish between a battery that needs recharging, one that requires replacement, and a situation where the charging system or parasitic loads are at fault.
The following sections outline common checks and procedures that can be performed with basic tools and safety precautions. These steps are meant to provide a framework for diagnosing a dead battery, but they do not replace professional evaluation in complex cases. Always consult a qualified technician if the issue persists or if there are concerns about electrical system integrity.
Inspecting for Corrosion and Loose Connections
The first step in troubleshooting a dead battery is a visual inspection of the battery terminals and cable connections. Corrosion appears as a white, bluish, or greenish powdery substance around the terminals and cable ends. This buildup acts as an insulator, impeding the flow of electrical current and preventing the battery from delivering power effectively. Corrosion is often caused by a reaction between the battery acid and metal terminals, and it can worsen in humid or warm environments.
To check for loose connections, gently wiggle the cables where they attach to the battery posts. A secure connection should not move easily. Loose terminals can cause intermittent electrical contact, leading to starting difficulties or unexpected power loss. If the cables are corroded or loose, cleaning and tightening are necessary before proceeding with further tests. A wire brush or a dedicated terminal cleaning tool can remove corrosion from both the posts and the cable clamps. After cleaning, the connections should be reattached firmly and coated with a thin layer of petroleum jelly or anti-corrosion spray to reduce future buildup.
It is also worth inspecting the battery case for cracks, bulges, or leaks. A physically damaged battery may leak acid, which poses a safety hazard and indicates that replacement is required. If the battery appears swollen, it may have been overcharged or subjected to extreme heat, and it should be handled with care and recycled properly.
Identifying Parasitic Drain
A parasitic drain occurs when electrical components continue to draw current from the battery after the vehicle is turned off. Common sources include interior lights, trunk lights, glove box lights, aftermarket accessories, or faulty relays. While a small amount of drain is normal to maintain memory settings in the radio or computer, an excessive draw can discharge a battery overnight or over several days.
To test for parasitic drain, a multimeter set to measure DC amperage is typically used. First, ensure the vehicle is off, all doors are closed, and any interior lights are disabled. Disconnect the negative battery cable, then connect the multimeter in series between the negative terminal and the cable. The reading should be compared to the manufacturer’s specification, which is often below 50 milliamps for most modern vehicles. A higher reading may indicate a parasitic load that needs further investigation.
If a drain is detected, the next step is to isolate the circuit responsible. This can be done by removing fuses one at a time while watching the multimeter reading drop to normal levels. Once the problematic circuit is identified, the specific component or wiring fault can be examined. Common fixes include replacing a stuck relay, repairing a short circuit, or disconnecting an aftermarket device that is not properly switched off.
Jump-Starting the Battery Safely
When a battery is too weak to start the engine, jump-starting can provide a temporary boost. However, safety precautions are essential to avoid sparks, battery damage, or injury. The process requires a second vehicle with a healthy battery or a portable jump starter. Both vehicles should be parked close enough for the jumper cables to reach, but they must not touch each other.
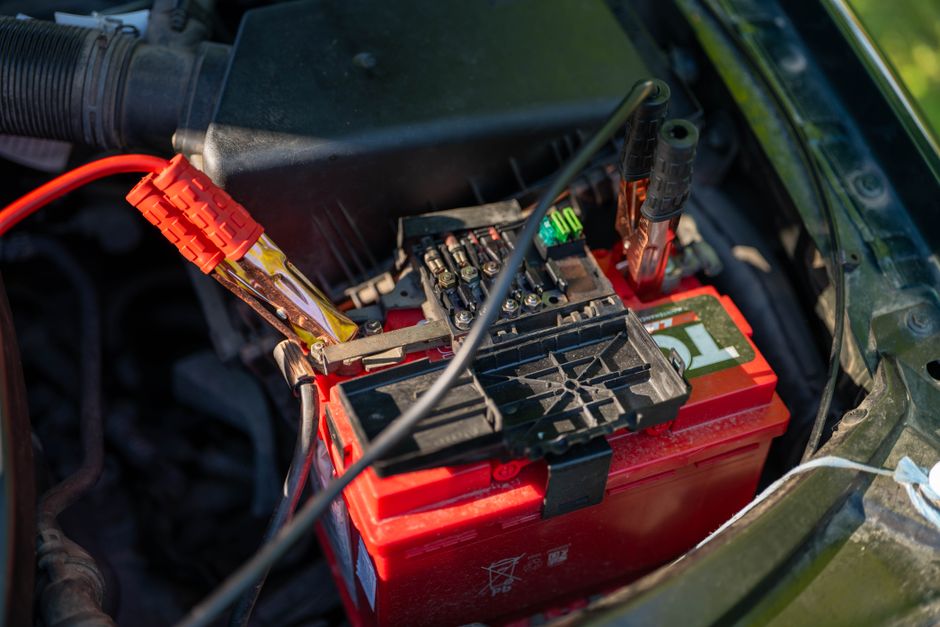
The correct sequence for connecting jumper cables is important. First, attach one red clamp to the positive terminal of the dead battery. Then connect the other red clamp to the positive terminal of the donor battery. Next, attach one black clamp to the negative terminal of the donor battery. The final black clamp should be connected to an unpainted metal surface on the engine block or chassis of the dead vehicle, away from the battery. This grounding point reduces the risk of sparks near the battery, which could ignite hydrogen gas.
After the connections are secure, start the donor vehicle and let it run for a few minutes to allow the dead battery to receive some charge. Then attempt to start the disabled vehicle. If it starts, let it run for at least 15–20 minutes to allow the alternator to recharge the battery. The cables should be removed in reverse order: first the black clamp from the grounded surface, then the black clamp from the donor battery, followed by the red clamp from the donor battery, and finally the red clamp from the formerly dead battery. Jump-starting is a helpful temporary solution, but it does not address the root cause of the battery drain.
Testing Battery Health with a Multimeter
A multimeter can be used to measure the battery’s voltage and assess its state of charge. With the engine off and the vehicle resting for at least a few hours, a fully charged battery should read around 12.6 volts or higher. A reading between 12.4 and 12.6 volts indicates a partial charge, while anything below 12.4 volts suggests the battery is discharged. If the reading is below 12.0 volts, the battery is likely deeply discharged and may require recharging or replacement.
To test the charging system, start the engine and measure the voltage across the battery terminals again. A properly functioning alternator should produce a reading between 13.7 and 14.7 volts. If the voltage remains at or below 12.6 volts while the engine is running, the alternator may not be charging the battery. Conversely, a reading above 14.7 volts could indicate overcharging, which can damage the battery and other electrical components.
A load test provides a more complete picture of battery health. This test applies a simulated load to the battery while monitoring voltage. Some multimeters include a load test function, or a dedicated battery tester can be used. During the test, the voltage should remain above 9.6 volts after 15 seconds under load. A sharp drop indicates that the battery has reduced capacity and may need replacement. Regular testing, especially before extreme weather seasons, can help predict when a battery is approaching the end of its service life.
Preventive Maintenance and Considerations
Routine inspection and maintenance can reduce the likelihood of a dead battery. Keeping terminals clean and tight, ensuring the battery is securely mounted, and checking the electrolyte level in serviceable batteries are simple steps. In cold climates, a battery that is already weak may fail more easily; therefore, testing the battery in autumn can help avoid winter breakdowns. Parking the vehicle in a garage or using a battery maintainer for long periods of inactivity can also preserve charge.
Modern vehicles have complex electrical systems, and a dead battery may sometimes point to a deeper issue such as a failing alternator, a short circuit, or an aging battery. While the troubleshooting steps described here address the most common causes, they are not exhaustive. In cases where the battery repeatedly dies after being charged or jump-started, a professional diagnostic inspection is recommended.
Understanding the condition of a car battery and the factors that affect its performance allows drivers to take informed actions. Whether the solution involves cleaning terminals, addressing a parasitic drain, or replacing an aged battery, a methodical approach helps ensure reliable vehicle operation and reduces unexpected disruptions.